Matt Stephens (dandt_matt)

For a list of my appearances in other domains of the web, please click here.
To get back to the home page, please click here.

Wednesday, December 1, 2010

Wordle

Ever seen a cloud of words on someone's blog or webpage and wondered what it was or how to do it.? Well Wordle is your answer.


Wordle uses the frequency of words used in a body of text to determine the size of each word featured in the cloud and creates a pictorial summay of the document. Word clouds can be made from words or just metatags in your website, to give users an idea about what the important points of the text are.


There are a number of word cloud building tools out there, all with a range of features. Blogger even creates one for me,featured on the left side of the page, based on the lables used throughout my blog. The picture to the right was created by Wordle using the words from my previous post about Prezi.


Wordle is really easy to use, online based and free. Students can either cut and paste text directly or type a web address to create a word cloud. Once the cloud has been created, it is simple to edit, colour and arrange words as required. There are even some advanced features available for web developers.

Some other possible classroom uses for Wordle include analysis of a body of text, deconstruction of a body of text and highlighting important points.


Some issues that I faced included:

* It is a java based app and requires java to be installed.

* You are unable to save the finished file anywhere except for Wordle's public gallery. The alternative is using the print screen function and editing / saving in paint or similar software.

* The drop down menus don't allow you to scroll, so when navigating them and using the scroll feature on your mouse, the menu disappears and the web page scrolls down..

* There are a limited amount of colour and formatting options. Randomising continiously is the best option, waiting until you find the best fit for your document.


Some positive aspects that I discovered included:
* Wordle automatically removes common words and also allows you to toggle this feature.

* There are a wide range of languages available.

* Quick, easy and free to use.

Please feel free to leave a comment and check out my other posts.

Sunday, November 28, 2010

Prezi

If you are an aspiring Mac user but are stuck with the Windows platform, specifically Microsoft PowerPoint, Prezi is a great way to make Mac stype presentations on the web.

This free online application is a simple way of creating presentations that can be shared, stored and presented on the web. The real winner however is the animation between slides, already used widely by Mac users and not available to those using Powerpoint.

The user interface is very simple to manage and although only some very basic features are available, it is still quite effective. Users are required to enter data onto a canvas, either text, images (uploaded) or shapes, and each item added becomes a new slide. Once you have finished adding data to the canvas, you join the elements with a "storyline", which when presented, is used to indicate the order in which each slide is presented.

Education users are well looked after, given free access and increased storage space and after creating an account, access is unlimited and free to all. You can sort and view presentations by friends, peers and other users very easily. A great tool for students to use without the need for saving, transporting and uploading presentations.

Some issues that I faced included:

On one occasion, I was unable to upload any images. The button just did nothing and despite a number of restarts, no luck. I was going to try using Mozilla rather than IE however upon trying again today, the feature works again.

The options are quite limited in terms of templates, however those with a big imagination will produce great things.

Prezi works best when you have a plan and a number of images ready to go. I would encourage students to search for heaps of relevant images, store them in a single folder, then begin preparing their presentation.

Some positive aspects that I discovered included:

The zebra tool is a great innovation, allowing users to zoom, rotatate and resize using the same tool. This allows you to increase or decrease the size of elements of your presentation, which is useful when you find yourself zooming out to fit in more things and finding that the font size keeps decreasing..!

There are a number of support avenues, including instructional videos, written tutorials and plenty of demo presentations.

Very simple interface, easy for students to pick up and work with.

Wednesday, November 24, 2010

Issuu

There are a wide range of web based applications available to students and teachers and sorting through the useful and the phishing is quite time consuming and difficult.

Issuu is an online magazine viewer, whereby users can access free content presented in the form of a magazine. You need to become a member to upload, however viewing is free.

I have found issuu useful when asking students to produce mock magazine articles, posters and powerpoint presentations. Students can either submit their work to me and I upload the best of the group or they can upload themselves, depending on the need.

Issuu is a great way for students to broadcast their work, share ideas and also conduct research.

Some issues that I faced included:

* Uploading word documents results in some strange formatting issues. Upload in .pdf for best results.

* Changing the size of the viewed documents is a bit tricky. Full screen function is available, however if you want to view a full screen, zooming in and out can be a pain.

Some positives aspects that I discovered included:

* All types of presentations can be uploaded; posters, powerpoint, documents, ect. A great, online viewing tool.

* Search feature means active design (or other subject content) magazines can be viewed. Like sending the students to the library without the books.

* Students can search my login name to find all of my publications, meaning I can post plenty of content and students can find it easily.

* You can sign in with your facebook account and receive notifications to and from facebook.

Thursday, November 4, 2010

Google SketchUp

Across a number of classes I have been using Google SketchUp as modelling, drawing and animation (see here for animation) software. Although it does have a steep learning curve and some pretty fundamental shortcomings, it is a great entry level CAD drawing package and it is free.

There are a wide range of professional CAD software providors that produce scaled down versions for education purposes, however you generally need to purchase the professional version in order to get the use of the scaled down version. I use Pro Desktop with more senior students.

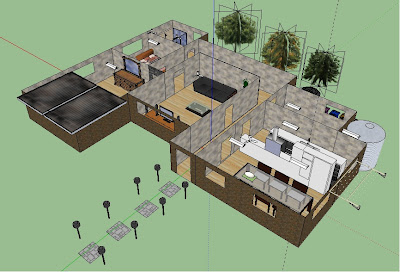
My current year 8 students are developing a sustainable house design, using SketchUp to produce an initial floorplan, before importing images from the 3D Warehouse to fill their home with appliances and features. Finally the students raise the walls of their house, use the paint feature to add texture and they are done. A 3D house.

I would certainly recommned completing the range of useful tutorials provided within the software. They make life much easier and students can also work through them on their own.

Some issues that I faced included:


* SketchUp has some minor issues that mean you have to make sure that you do everything in the right order. This sometimes means you need to delete what you just did in order to redo it in the right way.

* The move tool works in two ways, stretching your drawing when not exptected and requiring you to highlight all of an object in order to move it. If this object shares a line with another piece, then you are not able to move it without affecting the other object.

* Many of the tools have some interesting or strange ways of using them. Following the tutorials and with some practice, the package becomes easier and easier to use.

* The old versions are not compatable with new versions, for example, work done in previous years cannot be opened in the new, updated version for viewing this year.

Some positive aspects I discovered included:


* Firstly, it is free. This means it is great for one off projects and is easy to download and share.


* The rendering features are easy and effective. There are a wide range of paint options which can add a variety of textures, colours and effects to your designs.


* The animation feature is great. You can produce fly-throughs and a range of other features similar to Flash animations. A student initially figured this out and showed me; quite simple and effective.


* The ability to import and export images from and to Google Earth. This means that a house or landscape can be imported into a Google Earth image and presented as if it existed in that space.


* Simplicity. Many of the CAD programs I have used are very complicated and require plenty of training in order to produce a simple object. Google Sketchup enables you to draw a wide range of objects with relative simplicity.


Wednesday, October 20, 2010

Sustainable House Design Learning Object

One of the units I teach to year 8 students is a sustainable house design project, where the students are required to use Google SketchUp to design a sustainable house. More on SketchUp in my next post.

Prior to beginning work on the house however, I spend some time identifying sustainable design options with my students. Along with some great resources found by a fellow staff member (JT), I came accross this online resource made by the Queensland Government; Designing for Sustainable Living.

The learning object focuses on the design of a family home and incorporates a number of options and decisions that can be made. A final sustainablity report describes the impact of the decisions made and allocates a points value to each. Students finish with a final score (out of 300 I think..!)

There is quite a bit of written content embedded in the learning object and in the past I have prepared a worksheet for students to complete, however this year, I had students participate in an onine discussion (as described in the wikispaces post) which worked well and allowed students to access a record of their thoughts and actions which could be applied to their own house design later on.

Some issues that I faced included;

* It is a bit confusing to save your work and after creating a user, you need to use the same computer in order to retreive your work.

* It is possible to flick through the avaialble options and choose the one with the most points.

* Navigation is a bit confusing, especially at the start. You need to click "Siting" to return to the list of options to follow.

Some positive aspects I discovered were;

* The embedded content is very useful and can be printed out and used as notes for revision / application to students own project.

* The graphics are quite good and the layont works well.

* The range of sustainable options is very high and the module exposes students to a wide range of products and features.

Tuesday, October 19, 2010

Wikispaces

After my first experience with Blogging, I took a year off classroom based social media and did some research. The prospect of starting 7 or 8 blogs in 2009 didn't appeal to me and I went in search of a means of creating my own webpage. A place where I could upload all of my presentations, word documents, sound files, videos, etc. I was initially confused. Did I have to build my own web page and host it, paying all the associated costs..?

No... I stumbled upon the wiki...

In late 2009 I started my first wiki, as a trial run for the following year and found it extremely useful. The wiki I have created this year allows me to prepare a new page for each of my subjects and to link additional pages to each as required. Wikispaces also allows educators to upload and manage their wiki at no cost and I currently have 59 "files" uploaded onto my wiki.

Wikis are much more user directed. Rather than be constricted by the gadgets of a blog, the designer has much more control over the content and formatting. Images, videos, hyperlinks, and other content can all be formatted as required.

Some issues that I faced included:
* In order for my wiki to remain private, students need an account, email address and to ask permission to access my blog. Once this is done however, it is smooth sailing. I took about 30 minutes to get my class started.

* If I left my wiki public, it may be edited and changed by anybody = Public. There are a few issues associated with this; privacy, IP protection, etc.. I'm not too concerned about people using my work in their own classrooms, what I was worried about was people deleting my wiki content. I'm sure there are ways around this now, however I am yet to experiment with an open wiki. Comments and suggestions welcome..

* I fear that at the end of the year, I have to begin a new wiki because I would prefer to reveal only the current work to the students and add new content to the wiki as it becomes relevant. If you are happy for the content to stay on the wiki all year, then no dramas.

* Students still need a medium to create work of their own. Unless they are completing all classroom tasks in a workbook, they will need to begin a blog or wiki of their own which the teacher will need to access.


Some positive aspects I discovered included:
* One big winner with the wiki setup is the attached discussion tab. Students are able to discuss their work and "chat" on the wiki framework. I found that starting a discussion post each lesson allowed students to multi task, completing a classroom activity on the web (or otherwise) and talking about it via the discussion post. I found that they asked eachother questions, rather than myself if I was busy, and because I was the administrator of the discussion, I could monitor their discussions, deal with inappropriate comments and teach responsible use of the web.

* The freedom of the wiki is a big advantage. I was able to include all content and upload most file types that were needed for my classroom.


Please feel free to comment and leave suggestions for improvement.

Monday, October 18, 2010

Blogger

My first major step into the world of school based ICT was back in 2008, starting a Blog. I set up my own blog page and posted tasks for my students to complete. I also had my students start their own blog pages as a place for them to post their answers and complete a range of tasks. The purpose of this activity was to familiarise my students with working on the internet and the variety of applications and terms that applied. By following the link above you can see my first page and the student pages in respose.

Some issues that I faced included;
* I was limited by the gadgets of the blog. I was unable to upload word documents, powerpoint presentations etc. I now know however that with applications such as Google docs and Mikogo etc. it is possible to easily link from my blog to these external apps.

* I found that I could only host one subject per blog. After thinking that I would like to have a web page dedicated to each of my subjects, I ended up starting an individual blog page for each subject.. 7 Blogs.. Very time consuming to manage. My solution to this issue was to start a wiki... More to come on that in the next post.

* Due to the public nature of the blogs, students who completed the tasks first had their work copied by those who waited until the last minute


Some positive aspects of this task included;
* Students found it enjoyable to complete tasks on the web, rather than answering in their workbooks.

* We all ended up following each others blogs and could comment / evaluate each others work.

Please feel free to comment and leave suggestions for improvement.

Sunday, October 17, 2010

Background image source.

Thanks to www.burton.com for the background image. I downloaded it in late 2009 and have noticed that they no longer use it on their site. I am not aware of the original artist.